Brightin Star 11mm/2.8 II Example Shots

I recently received a Brightin Star 11mm/2.8 II in E mount. Here are some example shots on a Sony A7Rm3A (42MP) at ISO100, mounted on a tripod and with a remote release. I shot some comparison photos with the 7Artisans 10mm/2.8 II, its aperture range goes from f/2.8 to f/16, whereas the Brightin Star lens goes from f/2.8 to f/22. This is not a proper review of the Brightin Star lens but I hope the information will be useful to people considering this lens for panoramic photography.

The light during the day was fairly constant during each series of shots. Focus was manually adjusted using magnified live-view. The raw files were imported into Lightroom Classic 15.3 (Camera Raw 18.3), white balance was either shade or daylight, no other adjustments were made (no CA or vignetting). There were people in some of the shots who have been erased so this may have resulted in some artifacts which you should ignore. The shots were exported as JPG at full resolution and 100 quality.

Sharpness and Vignetting vs Aperture

7Artisans Far Field Centre Focus, Aperture Series f/2.8, 4, 5.6, 8, 11, 16 (People Removed in Lightroom)

Flare Handling

Observations

The field of view (FoV) of the Brightin Star is considerably smaller than the 7Artisans. The claimed diagonal FoV of the Bright Star lens is 182 deg, however when measured directly or from a full panorama, it is in the region of ~167 deg.

The optimised lens parameters, derived from a full spherical panorama assembled in Hugin results in the above coverage. The horizontal & vertical FoVs are ~102 deg and ~144 deg respectively in portrait orientation. This does allow a shooting pattern of 4 shots at 90 degrees horizontal spacing plus Zenith and Nadir shots (4+Z+N). On the A7Rm3A, this results in an equirectangular panorama of approximately 18000 x 9000 pixels. Example below as an equirectangular, also viewable on Kuula.

Example panorama shot using the Brightin Star 11mm/2.8 II Fisheye lens using the A7Rm3A with a 4+Z+N pattern.

The source photos and a Hugin project file can be downloaded here released under the Creative Commons CC BY-NC-ND 4.0 licence. The JPG files were exported from Lightroom from the raw files. Exposure and shadow recovery, black levels, and CA correction were applied.

The vignetting of the Brightin Star wide open is quite strong. Not apparent in the outside shots, but noticeable on interior shots with white walls is a cyan colour cast in the corners.

Concluding Remarks

The build of the Brightin Star is metal, solid and dense. The clickless aperture and focus rings are well damped. The sharpness is fine. However, I do not feel it provides anything over the Samyang 12mm/2.8 or the 7Artisans 10mm/2.8 II, except the lower price. The vignetting is worse than the 7Artisans and Samyang lenses, and the colour cast will require a lens profile to remove.

The FoV does allow a 4+Z+N shooting pattern, providing a similar final panorama size as the Samyang lens, but it is a touch tighter (the Samyang has a horizontal FoV of 106 deg) which gives less flexibility in choosing control points in the overlap region. The 7Artisans lens has a horizontal FoV of ~114 deg (~185 deg diagonal) which makes it even more comfortable shooting 4+Z+N than the Samyang, though with a slightly reduced final panorama size of 17000 x 8500 pixels.

I will continue to use the 7Artisans 10mm/2.8 II lens for my panoramas. The colour cast in the corners of the Brightin Star lens may be due to an interaction with the sensor stack on the A7Rm3A so it may not be a problem on other cameras, but this will need to be confirmed. The smaller than claimed FoV is disappointing, however. I have reached out to the company to query this, but without a response after several weeks yet. But for now, the Brightin Star 11mm/2.8 II will be left on the shelf.

Notes

All information provided without guarantee or warranty. I bought the Brightin Star 11mm/2.8 II at retail price, and as for all other equipment mentioned. This post is not sponsored and represents my own opinion. My impressions of the 7Artisans lens can be found here.

Nadir Patching with Hugin

The nadir part of a panorama often needs to be edited to remove a tripod or else fill in hole in the coverage. A common way to edit the nadir is to convert the equirectangular projection into cube faces, edit the bottom face, reassemble the cube faces, and finally remap back into equirectangular.

There are tools available in various panorama software as well as online services which can perform such cube face extraction and reinsertion. The same essential functionality can be achieved in Hugin (which is of course free). I have written a tutorial on how nadir patching can be done, assuming you have an image editor that can fill in the nadir hole, such as Photoshop, else if your retouching/cloning skills are up to the job. This is released under a Creative Commons CC-BY-NC-ND 4.0 licence.

Impression of the 7Artisans 10mm/2.8 Mark II Fisheye Lens

7Artisans 10mm/2.8 Mk II Fisheye Lens mounted on Sony A7Rm3A. It is of metal construction with a focussing and aperture ring. Both are well damped, the aperture ring is clickless. The marking are phosphorescent, aiding use in the dark. The cap is made of metal and is a friction fit. Included with the lens is a protective case.

My trusty Samyang 12mm/2.8 Fisheye lens had an accident (my fault) that left me looking for a replacement. The 7Artisans 10mm/2.8 Mark II Fisheye lens was recently released and the reviews I could find were positive. Here are my impressions of the lens. I do not claim it is a review, but rather my observations after having had the lens a few weeks and after some preliminary testing. I will need to spend more time with the lens and take more panoramas before I can come up with a more comprehensive assessment. My remarks are coming from the perspective of panorama taking, rather than for general photography (though fisheye lenses are quite specialist and niche in their application).

Build

The lens is of metal construction. It is heavier than the Samyang 12mm/2.8, being 602g vs 525g for the latter lens in E mount. It is more compact, however, which makes it easier to use on smaller panorama heads as the upper rail does not need to be as long. Though I did not have any complaints about the Samyang lens, the 7Artisans lens is reassuringly solid.

Lens and Camera mounted on a Nodal Ninja 3 Mk II. The upper rail setting for this combination is 85.2mm. The Samyang 12mm/2.8 upper rail would be about 1cm greater which makes use on the NN3MkII difficult without the nadir adapter.

The focus ring is well damped, going past infinity focus. It seems to be reasonably well calibrated. Though with the depth of focus being so small on short focal length lens, it is always a good thing to confirm focus using live-view. One minor complaint is that the aperture ring has no click stops. The ring is also well damped so unlikely to shift without being touched, but I would have preferred it be clicked to provide extra confidence it would stay at the set aperture. The markings on the lens barrel are phosphorescent so will glow in the dark which helps when doing night panoramas.

The front cap is friction-fit slip-on metal cylinder with felt lining. So far it has not fallen off unintentionally but it is yet to be seen if it will still remain a tight fit after years of use. It feels better than the plastic cap of the Samyang, and the tabs on the Samyang weren’t the most inspiring either. The jury is out on whether the 7Artisans lens cap will stand up over time.

Otherwise, the lens is quite sleek and not too imposing. The front element is reasonably protected by the lens hood (non-removable), as much as can be expected for a 185 deg angle of view lens.

Front lens element. The lens hood is metal and non-removable.

Optical Characteristics

In comparison with the Samyang 12mm/2.8, the 7Artisans 10mm/2.8 Mk II does have a wider field of view on the diagonal, long, and short sides. It should be noted that the “focal length” of a fisheye lens does not tell the entire story of its field of view, not like for an ideal rectilinear lens. There are different fisheye lens mappings of incoming ray angle to position on the image plane, the Samyang and 7Artisans lenses are typical of the Stereographic type. For my preferred way of panorama taking, it is the angle of view on the short side of the frame that is most relevance as this determines how many shots are required in the azimuthal direction to cover 360 degrees around the equator of the panorama. The Samyang lens has roughly 106 degrees FoV on the short dimension of the frame, whereas the 7Artisans lens has a FoV of around 114 degrees. Hence both allow using only 4 shots around the equatorial direction. The FoVs on the long dimension of the frame are approximately 156 degrees and 170 degrees for the Samyang and 7Artisans lenses respectively. Hence a Zenith shot as well as a Nadir shot are required to complete the sphere.

7Artisans 10mm/2.8 Mk II coverage of an equirectangular panorama. It supports a 4+Z+N shooting pattern, where there are 4 shots taken around the azimuthal direction at 90 degree intervals, together with Zenith and Nadir shots to cover the holes at the poles.

Technically, the focal length of a fisheye should best describe the magnification of the image in the central portion of the image, i.e. how many degrees of the field subtend a millimetre of the sensor, or equivalently, how many pixels are there per degree (for a given sensor pixel pitch), called the paraxial focal length. Unfortunately, most manufacturers do not specify fisheye lens focal length accurately in this way, perhaps for marketing reasons (since most consumers are unlikely to be familiar with the finer points of optical design). The Samyang lens is around 13.1mm focal length which allows approximately 14000×7000 pixel panoramas on a 24MP camera like the Sony A7m3 with a 36mm x 24mm sensor. The 7Artisans lens is around 12.1mm focal length allowing approximately 12500×6250 pixel panoramas. The slight reduction in final panorama size is not a tremendous issue for me. I find the 17000×8500 pixel panoramas using the 7Artisan lens with the A7Rm3A to be adequate for the majority of the panoramas I wish to take, only slightly smaller than the 18000×9000 pixel panoramas using the Samyang lens.

Start chart, centre crops. Top row (L-R): f/2.8, f/4. Middle (L-R): f/5.6, f/8. Bottom (L-R): f/11-f/22. Taken on the Sony A7Rm3A, ISO100. The moiré patterns indicate that the lens can deliver high spatial frequency detail to the sensor (that does not have an anti-aliasing filter). The closer to the centre of the pattern that the moiré reaches, the higher the spatial frequency the lens can resolve. It can been seen at high f-numbers that the image softens and the moiré artifacts diminish.

Sharpness is good wide open at f/2.8 for the 7Artisans lens, though best performance is around f/4-f/5.6 in the centre and edges. Corners are best around f/5.6-f/8. At f/8 sharpness is comparable to f/5.6 though diffraction softening is noticeable at f/11. I would rate the sharpness as fine, it does not seem to be lacking in normal use. The extreme corner can be soft if not stopped down, though these are usually cut-off in the final panorama so do not contribute. There is curvature of field, though I have not mapped it to see how it is shaped. Curvature of field has a practical effect on how much you have to stop down a lens to ensure that different parts of the scene are adequately in focus, such as the ground that is usually located at the bottom of the azimuthally panned frames versus distant objects near the horizon located at the centre of the frame. More testing will be needed to work out the best combination of focus distance and aperture for difference scenes and situations.

Start chart, corner crops. Top row (L-R): f/2.8, f/4. Middle (L-R): f/5.6, f/8. Bottom (L-R): f/11-f/22. Taken on the Sony A7Rm3A, ISO100. Photos were focussed at the corner. There is some vignetting of the corners which reduces as the lens is stopped down. CA correction in Lightroom has removed the majority of colour fringing.

Flare resistance is reasonable, though with the occasional flare or glare. This can usually be worked around by a slight change in the positioning of the light source in the frame. When stopped down to f/4 or more, sunstars are prominent. It is a nice effect, though it can sometimes dominate an image. Internal mechanical vignetting seems to be low and I have not noticed asymmetric sunstars or out-of-focus bokeh balls at large apertures (low f-numbers). The Samyang lens is inferior in the respect, with cut-off sunstars wide-open.

Example of flare. If there is a strong source of light in the centre, then flare may be observable in the corner as a coloured rainbow.

In-Use

With the lens mounted on my camera, it is usefully smaller than the Samyang, though with slightly increased weight. It balances nicely when handheld, and is no more unwieldy on the panohead than the Samyang, even though it is heavier, but the point of balance is closer to the camera.

The lens is fully manual without any electronic contacts to give information to the camera. The camera is set to allow shutter release without a lens being detected. If the scene does not have much in the way of close-up detail, then I will tend to use f/5.6 and focus near infinity to optimise detail of far away objects. For more general scene with a mixture of near and far detail, I will use f/8 and try to use the hyperfocal distance. I try to avoid f/11 or narrower to avoid diffraction softening. If there are very near and far away detail I want to capture, then combining shots with different focus settings could work.

Samyang 12mm/2.8 internal plastic space ring. This plastic part screws together the built-in E mount adapter and the lens assembly. Unfortunately, an accidental drop caused this part to snap. Hence I bought the 7Artisans lens as a quick replacement.

One thing that I will be sure to keep an eye on is temperature induced changed of focus. If the lens warms up or cools down during a shooting session, the focus could shift significantly due to the small depth of focus of short focal length lenses. I have noticed this effect in other fisheye lenses, the infinity focus setting was noticeably different in cold or warm conditions, and would shift if, for example, the lens cooled down after being taken out of a warm bag, Aluminium (which I assume the lens is made of) has a lower coefficient of thermal expansion than commonly used polymers such as ABS or Polycarbonate, so perhaps this lens will exhibit less thermal focus drift than lenses with polymer structural elements. The Samyang lens (at least in E mount) has a polymer spacer whose expansion could affect focus.

Sunstars from the 7Artisans 10mm/2.8 Mk II at f/8. The lens has 10 aperture blades. Sunstars are prominent from f/4.

The strong sunstars does mean that taking shots are night with concentrated light sources requires extra care to make sure that they are captured properly and do not get cut off by the edge of the frame. It’s also important to ensure that there are no flare spots, you can try to block the strong light source to get a clean version of the shot, or else change the shot direction to mitigate against glare.

Close-up of flare spot.

Preliminary Conclusion

The 7Artisans 10mm/2.8 Mk II is a nice lens, solidly constructed, with a handy field of view for use on 135-format sensor cameras comfortably allowing a 4+Z+N shooting pattern to cover the sphere using an 135-format sensor camera. Sharpness is good across the frame, with optimum apertures f/4-f/8. Sunstars are pronounced, flare resistance is reasonable in most circumstance, with the occasional flare spot with strong light sources. For the price, it is a reasonable alternative to the increasingly difficult to source Samyang 12mm/2.8. Further comparative testing is needed to determine which one has better performance, however.

Koornbrug Bridge, Leiden, Netherlands. Full panorama can be seen at 360Cities.net. Taken with the 7Artisans 10mm/2.8 Mk II using the Sony A7Rm3A, f/8 ISO100, AE, 4+Z+N plus an extra shot to take care of a cut-off bicycle light streak. Post-processing in Lightroom Classic, Hugin, Picture Windows Pro 7/8, and Photoshop. Equirectangular panorama re-mapped to stereographic projection.
–
Projection: Stereographic (4)
FOV: 271 x 203

Recent 360Cities Editor Picks

Some of my recent panoramas have been selected as Editor Picks by 360Cities.net.

Elizabeth Quay, Perth, Western Australia. Night panos can be challenging with high contrast, shadows, and long exposure times. Here, I hid my camera and tripod in the shadow of a stature to avoid casting a separate shadow.
Crail Harbour, Fife, Scotland. A low and secluded vantage point was chosen to give a slightly different perspective of the harbour.
JPL Spaceflight Operations Facility Observation Gallery, NASA. The lighting conditions were challenging with high contrast between the brightly lit and dim areas, together with coloured lighting. A high ISO was chosen to avoid excessively long exposures. The dynamic range of the camera was sufficient to capture the scene without bracketing.
Circular Quay West, Sydney, Australia. With the sun quickly setting and the light changing, this pano was taken quickly to capture the ambiance at dusk.
Gordon’s Bay, Sydney, Australia. Underneath an overhanging rock provided an interesting vantage point. The strong contrast of the scene was tamed by bracketing exposures and combining different regions. A painterly look has been chosen to give a more abstract or dreamy impression.
Anstruther Harbour, Fife, Scotland. The slightly cloudy conditions provided interesting colour and textures to the sky.

I recently upgraded my Sony A7m3 (24MP) to the A7Rm3A (42MP) which has allowed an increase in panorama size from 14Kx7K to 18Kx9K when using the Samyang 12mm/2.8 fisheye lens. The bodies are very similar that has reduced the learning curve, though I am still getting used to the sensor characteristics, in particular the noise and dynamic range of the high resolution body.

I have begun to use exposure bracketing more often, even if I do not necessarily require all the frames, just for insurance. It is preferable to shoot more shots than needed than find out later that you’ve under or overexposed a scene, especially if you cannot easily go back or if the circumstances are difficult to replicate.

Exposure Fusion Example + Files

Bishop Forbes Memorial, St Paul’s Episcopal Cathedral, Dundee 9th April 2022

Panorama at 360Cities.net

I recently was able to take a panorama of St Paul’s Cathedral, Dundee. I am releasing an example Hugin PTO file as well as JPG image files to stitch. This example demonstrates a few techniques that may be of benefit to other panographers.

The example files are made available under the Creative Commons licence without guarantee. They are not full size, and the final version on 360Cities has had some post-processing applied so will be slightly different to the version as produced by the example files.

Example files St Paul’s Cathedral, Dundee (ZIP archive)
Creative Commons Licence
St Pauls Cathedral, Dundee by Daniel K. L. Oi is licensed under a Creative Commons Attribution-NonCommercial-ShareAlike 4.0 International License.

Some familiarity with the Hugin program is recommended. The Hugin manual and tutorials can be found at Sourceforge. The examples files included in the ZIP archive include the PTO project files and JPG source images (for reasons of file size) that can be stitched to obtain an exposure fused example panorama.

Shoot Details

The shot patten with a Samyang 12mm/2.8 fisheye lens on the Sony A7m3 is 4 shots taken at 90 deg horizontally, zenith, and nadir. The azimuthal shots were angled slightly down (~10 deg) so to reduce the size of the nadir patch. The tripod legs were also brought in to narrow the stance to help reduce the obstructed area. A nadir adapter on the Nodal Ninja 3 Mk III was used to allow the camera to be positioned directly over the shooting position without the tripod in the way for the nadir shot. An additional shot was also taken from a slightly different position in order to cover the shadow of the tripod and camera.

Note: Usually when taking panoramas, the lens should be rotated around the no-parallax point (NPP) that is located at the lens entrance pupil (EP). The NPP is often erroneously referred to as the “nodal point”. The nodal points of a lens are different to the NPP (see Wikipedia article “Panoramic photographers often incorrectly refer to the entrance pupil as a nodal point, which is a different concept”).

Exposure Bracketing


The camera was set to ISO100, image stabilisation off, and a remote shutter release used.  Due to the bright stained glass windows, I bracketed exposure -2,0,+2EV. However, I did not need the +2EV shots so only imported the -2EV and 0EV shots. I have placed the shots into stacks.  The last 2 shots are the ones to patch the camera and tripod shadow.

Autoexposure and raw processing

Capture One 22 Express (For Sony)

Received wisdom is that panoramas have to be taken using fixed manual exposure settings, else the panorama won’t blend properly. This may have been the case 10 years ago but modern software can easily cope with photometric optimisation and compensation of varying exposures throughout a panorama. Exposing each segment of the panosphere optimally will give better image quality overall, in fact. It can save time and effort using autoexposure in cases where the intra-scene contrast is smaller than the inter-scene contrast (in different directions/shots). This can be combined with bracketing if single-shot contrast is excessive.

When processing the raw files, it is recommended that the same white balance be applied to all shots, though there are some circumstances and specialised techniques where different white balances can be used. But normally, the same white balance for all shots will usually result in better blended output.

Shooting raw also has the benefit of extracting the most exposure latitude from each shot. For these shots, I have used the maximum amount of highlight recovery and this has allowed the detail in the windows to be retained in the -2EV shots. Correction of chromatic aberration, purple fringing, and lens fall-off has also been applied at the raw development stage.

Control Point Placement

The placement of control points is at the seams between overlapping images. There is no need to have control points outside of these, the blending process just needs that the features match along the seam lines.

Nadir Shot

Taking a separate nadir shot to add to the panorama takes only a few extra moments, but can lead to more professional looking and immersive results. A nadir adapter simplifies matters but even without, it is straightforward to cant the camera directly over the spot where the tripod was located for the other shots and take an image of the ground. It is best to try to match the height of the camera to the other shots but in many cases, slight differences in height won’t be a problem for flat ground. If there is the possibility of parallax, then it is crucial to try to maintain entrance pupil position.

The nadir is connected to the azimuthal shots by 2 control points each. Using a narrowed tripod leg spread, the area of the nadir that needs to be patched can be minimised.

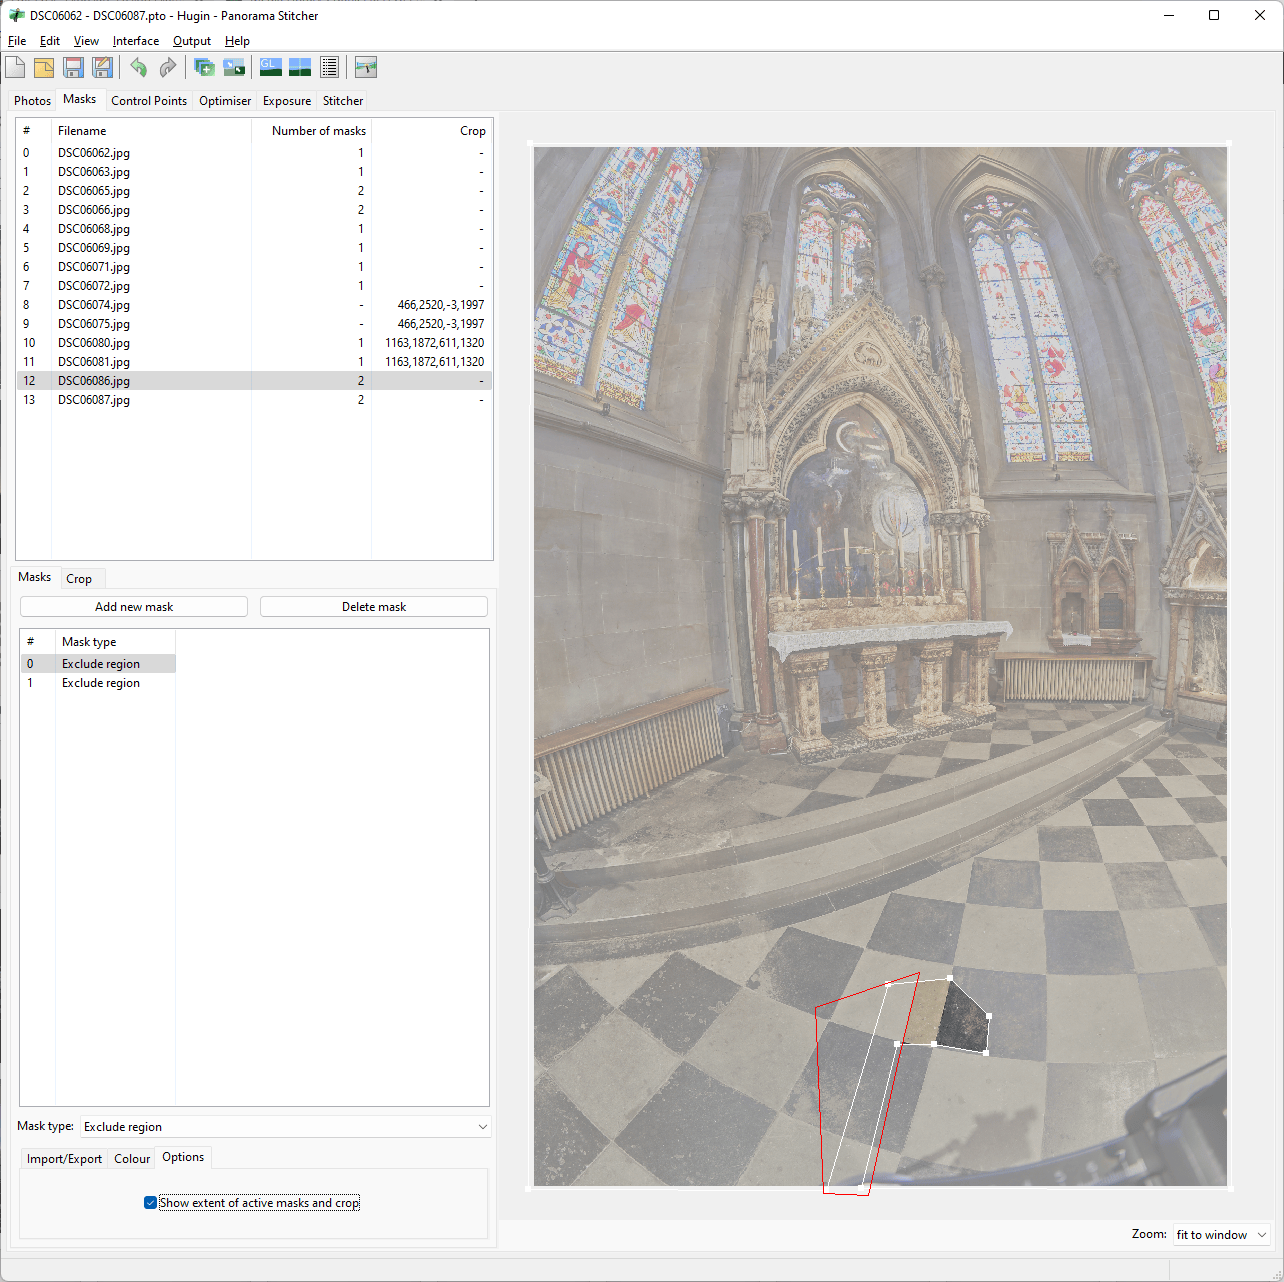
The nadir shot is masked out to eliminate the legs and define a small region to be inserted into the rest of the pano. Here, tripod leg shadows had to be excluded. Due to the position of the spot lights, it was difficult to place the tripod in a way that avoided them entirely.

In Hugin, the nadir shot is given its own lens so that the geometry can be optimised separately.  , hence reducing the amount of geometric distortion that may be induced in the nadir shot to match the placement of the rest of the panorama.

Tripod Shadow Patch Shot

There was a particularly strong shadow  of the tripod and camera that would need to be edited out in post-processing. Masks were used to exclude the shadows from the panorama.


A separate shot was taken with the camera and tripod moved about half a metre so that a clear shot of the ground without shadow could be taken. This shot is inserted to cover the shadowed area. Only a small section of the image is required, hence can be mapped quite effectively despite the large displacement of the entrance pupil. For longer shadows, a patching image may need to be imported multiple times and parts of it mapped into the panorama separately.

Final Output

Hugin can produce an exposure fused panorama which combined highlight and shadow detail in a natural looking way. The nadir and shadow patches will reduce the amount of postprocessing required. There are a few residual faint shadows due to other lights in the scene but these are very easily dealt with in Photoshop or other image processing programmes.

There are alternate methods of handling high contrast scenes, such as High Dynamic Range imaging and Tone-Mapping. Exposure fusion (e.g. using enfuse) is often simpler. Here, the inbuilt exposure fusion method was used, but more control over the final result can be achieved by exporting each exposure plane separately and using the command line options in enfuse.

Recent Panoramas

I’ve just gotten back to taking and making panoramas after a break of several months. Some good weather lately inspired me to go out and try to capture the light.

Rock outcrop, sunset, ocean, castle
Rock outcrop, Castle Sands, St Andrews, Fife, Scotland 30th June 2021. The tidal range here is 4.32m, thus at low tide many rocky outcrops are exposed as the tide goes out. Full panorama can be viewed at 360Cities.

Ocean, castle, pool, waves, sky, clouds, sunset
Tidal pool, Castle Sands, St Andrews, Fife, Scotland 30th June 2021. “The surge in popularity of seaside resorts in the mid-19th century, and the fashionable practice of sea bathing, made St Andrews an attractive tourism destination. The Ladies Pool, today known as the ‘Castle Pool’, was situated on the east side of the Castle ruins with shelters and huts for dressing. The pool was largely abandoned in the 1930s when the larger outdoor Step Rock Pool started to allow both male and female swimmers.” From St Andrews Preservation Trust. Full panorama can be viewed at 360Cities.

The conditions were perfect for landscape photography with high altitude clouds providing texture to the sky, a moderately clear horizon for the setting sun for lovely colours, and not too windy. The waves add texture to the water but do pose a slight challenge to making sure that seams are not too obvious. A small amount of retouching during post-processing was needed to smooth over the most obvious joins.

The main challenge is dealing with the large range of contrast within the whole scene. The dark rocks and seaweed have to be balanced against the sunset and bright sky. Much of this is able to be handled by the dynamic range of the camera, a Sony A7m3 shooting raw, but some additional steps needed to be taken to comfortably cover the extremes in exposure. In addition to the usual shooting pattern of 4 around (spaced at 90 degrees) + Zenith + Nadir, additional shots were made directly at the brightest parts of the sky using autoexposure (as I use for all the shots). This additional shot will have detail in the brightest parts that can be combined with the rest of pano that has detail in the dark and mid tones. Enfuse is used to combine the various exposures into a single image without having to go through the steps of creating an HDR intermediate image and then tonemapping.

I have also delved into the back catalogue of panoramas that were taken but but assembled, in this case ones taken in 2019 and 2020.

Christmas Market, Big Wheel, Glasgow
Glasgow Christmas Market, 19th December 2019

Pollok House West Pavilion
Pollok House West Pavilion 27th September 2020. Full pano can be viewed at 360Cities.

Kelpies, sculpture
Kelpies, Grangemouth, 4th October 2020. Full panorama can be viewed at 360Cities.

These panoramas varied in difficulty. The Christmas Market pano had many extra shots added and masked in to deal with moving objects such as people and the Big Wheel. Exposure blending was also used to tame the contrast. The Pollok House pano did not have to worry to much about moving objects between frames but did have a very large contrast range. This require bracketing and exposure blending to arrive at a  decent image. The Kelpies pano was as staightforward as you could get, a simple 4+Z+N shooting pano, no need for bracketing as the dynamic range of the camera was sufficient, and not even exposure blending was required.

I’ll continue to dive into the back catalogue to see of there are any more unassembled panos waiting for their turn. Hopefully there are some undiscovered gems.

First rule of Pano Club…

Lens entrance pupil
The image of the aperture stop of a lens when looking from the object side is the entrance pupil. Light rays that can pass through the lens to form an image must pass through the entrance pupil, hence this defines the point of perspective. To avoid parallax when rotating the camera, it must be rotated around the entrance pupil

From Wikipedia:

“The geometric location of the entrance pupil is the vertex of the camera’s angle of view[1] and consequently its center of perspective, perspective point, view point, projection centre[2] or no-parallax point.[3] This point is important in panoramic photography, because the camera must be rotated around it in order to avoid parallax errors in the final, stitched panorama.[4][5] Panoramic photographers often incorrectly refer to the entrance pupil as a nodal point, which is a different concept.”

Repeat after me, “It’s not the nodal point, it’s not the nodal point, it’s not the nodal point!”

Simple Hugin Example with “Wrong Technique”

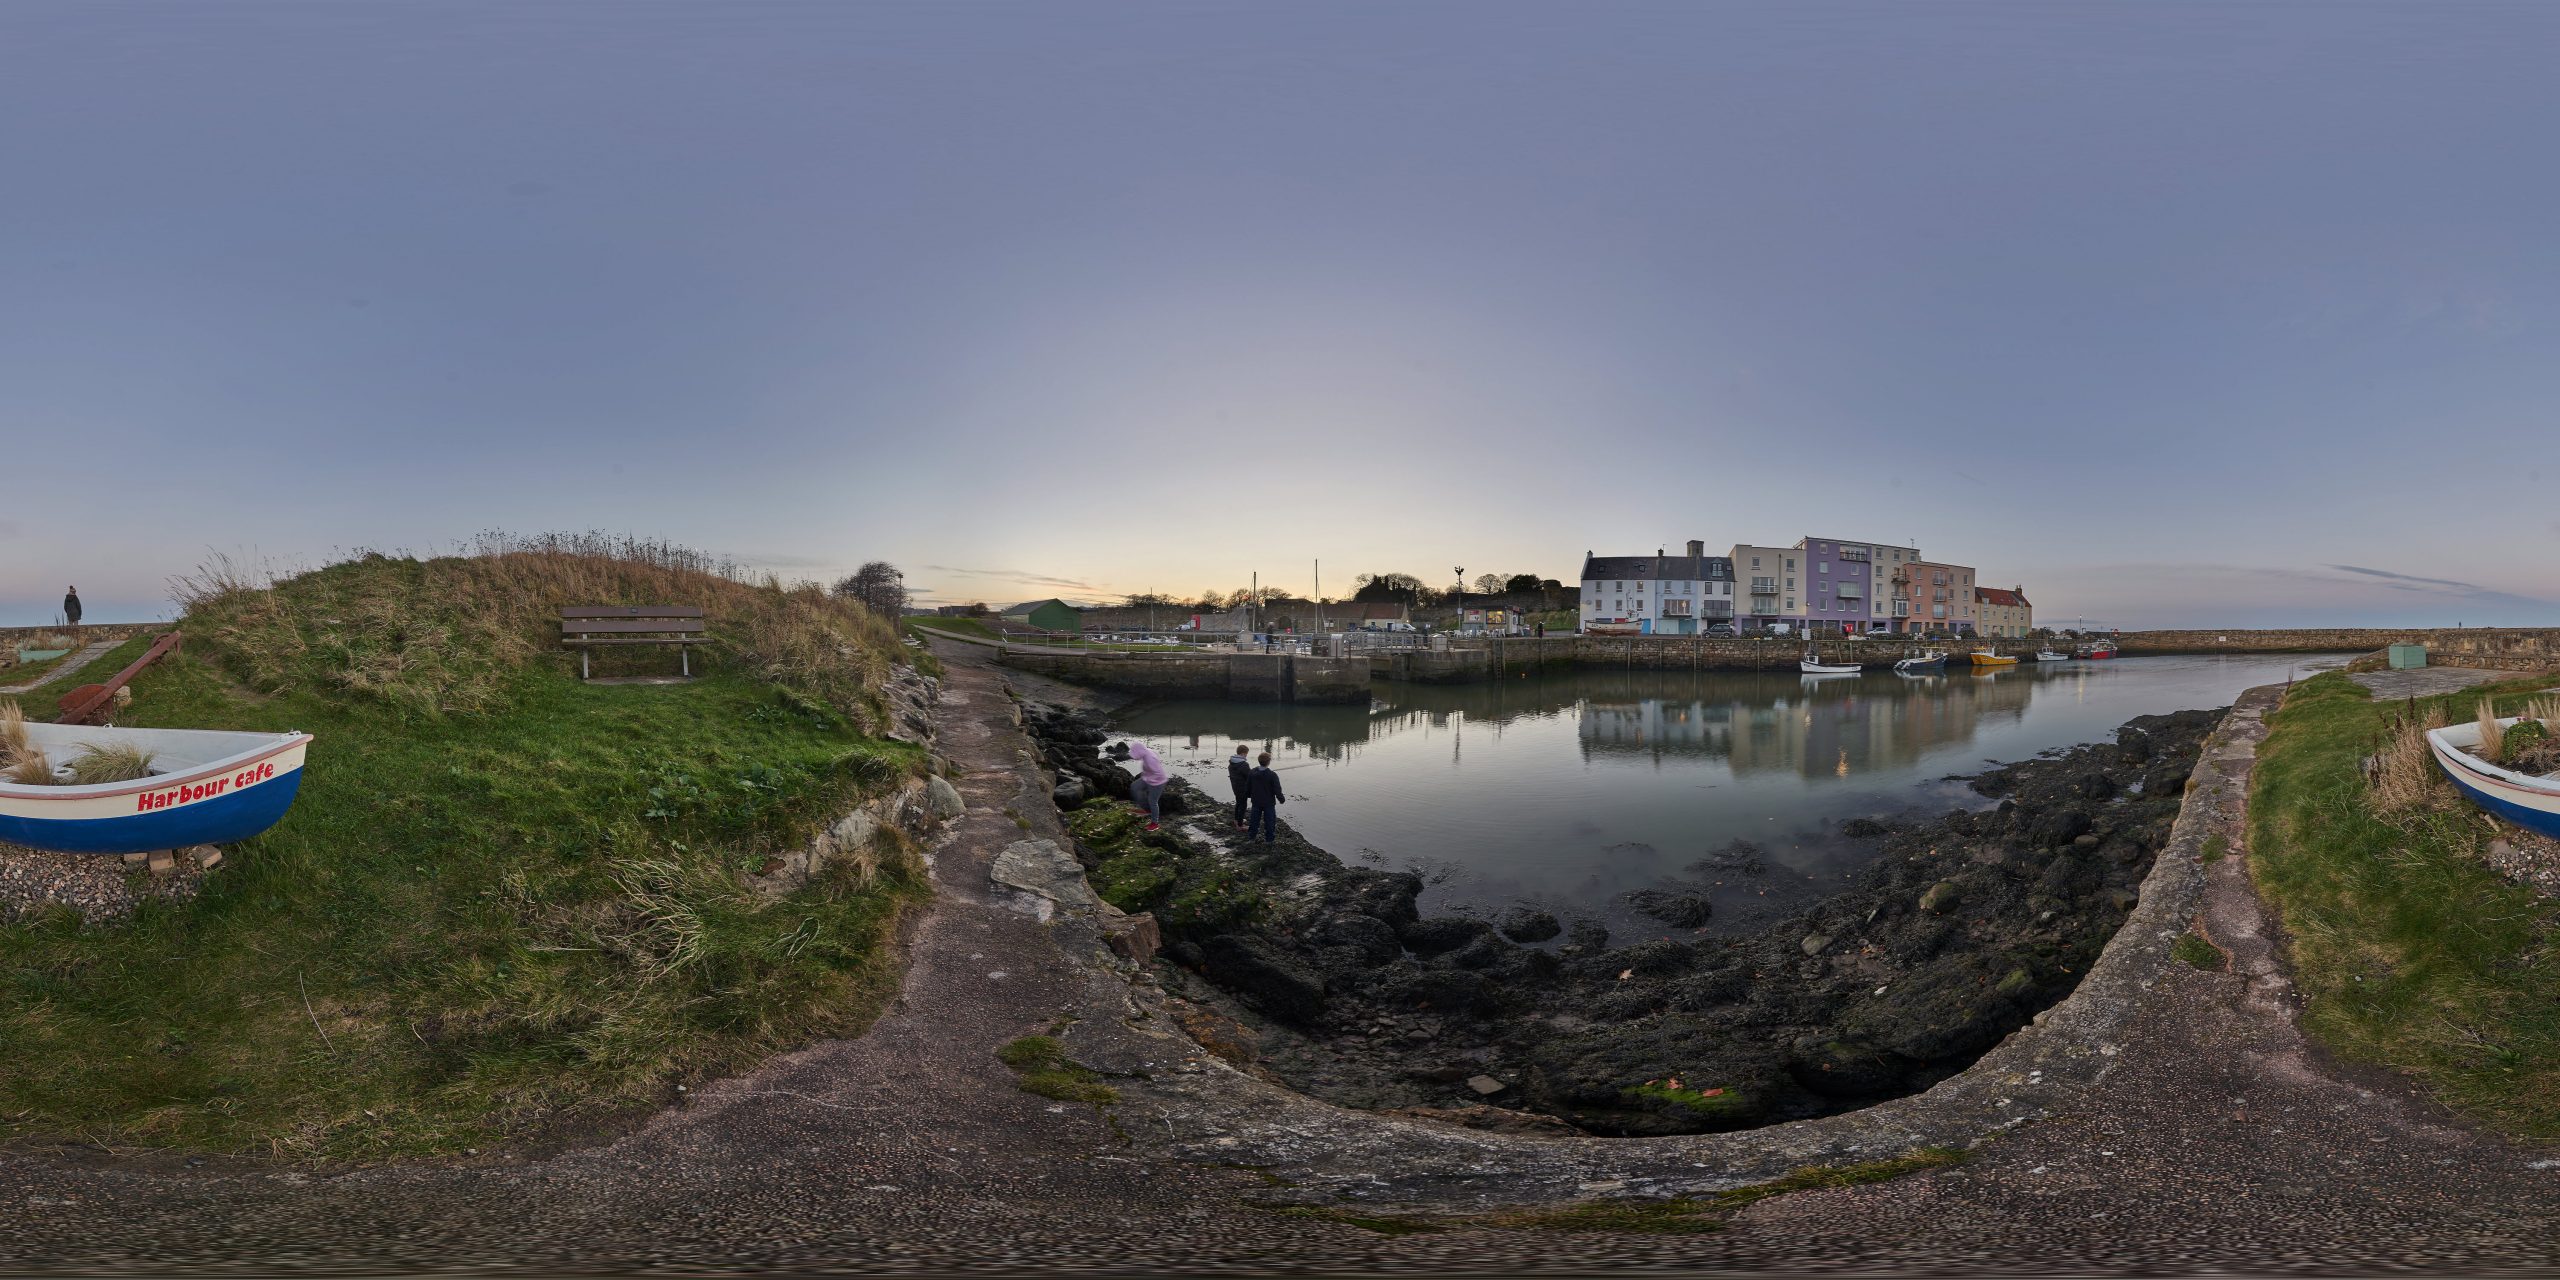
Sunset over St Andrews Harbour, Scotland. Equirectangular projection 360 deg x 180 deg. Sony A7m3 + Samyang 12mm/2.8 Fisheye, Nodal Ninja 3 Mk III, Capture One, Hugin, and Picture Windows Pro. This is the final stitch without adjustments. Further post-processing steps may include exposures curves, sharpening, saturation adjustment, and eliminating dust spots in the sky.

Source Images & Hugin project file (17MB zip)

Creative Commons Licence
This work is licensed under a Creative Commons Attribution-NonCommercial-ShareAlike 4.0 International License.

Here is an example of a simple 360 deg panorama in Hugin that shows that good results can be obtained using “wrong” techniques. Specifically, you can use autoexposure, even for highly contrasty scenes that normally would required bracketed exposures and HDR+Tonemapping.

For post-processing, you can crank up the highlight and shadow recovery and individually tweak each frame for exposure. It is not necessary to shoot with manual exposure with each frame with the same exposure settings, nor process them identically.

Additionally, you do not need very much overlap between frames in many cases, only a few control points can do, and they only need to be placed along the seam lines.  A few manually well placed control points can quickly give a good stitch.

This example also shows some other things that you may need to watch out for. You should clean your lens and sensor. I’ve not been able to do much photography lately so my equipment has not been maintained as well as they should have been. My lens also needs to be adjusted as the plane of focus is slightly skewed and it does not reach infinity focus. This is slightly masked by the depth of field at f/8 but can still be detected in the full sized source imagery.

I have provided downsized source images and a Hugin project file if you want to have a look at how it was assembled. I only spent a few minutes putting it together so I’m sure it could be further optimised. The final full sized and processed panorama can be seen at 360Cities. I adjusted the exposure curve, sharpened the image, tweaked saturation, and repaired the dust spots in the sky.

First Shot. I set up my tripod with a Nodal Ninja 3 Mk III. The rotation axes of the panohead is aligned with the no-parallax-point of the lens (it’s not called the “Nodal Point”!). I tilt down to minimise the Nadir hole, bringing in the tripod legs slightly also helps reduce the size of the Nadir patch. I oriented the first shot to capture some bystanders, making sure that they were towards the centre of the frame (don’t want to have anyone cut in half). I also made sure to centre the brightest spot in the sky as I will be patching it with a lower exposure shot. The camera was set to its lowest native sensitivity (ISO100 in this case) and I used autoexposure. The lens is manual focus and manual aperture so the camera controls the shutter speed automatically. I set the lens to be at f/8 and the focus was placed at an approximate “hyperfocal” distance. I used a remote shutter release to minimise vibration. I recorded full uncompressed raw files for later processing.
Second Shot. I rotates the camera by 90 deg using the click-stop rotator on the panohead. For simple scenes, where there are no moving objects, the amount of overlap between frames can be minimal. Here, there is only 10 to 15 deg overlap between the horizontally rotated shots. In more complex scenes, where the could be moving people, cars etc., it may be necessary to take shots in many more different directions in order to produce a stitch with not objects cut in half.
Third Shot. I had also set up the shot so that the main object in the scene (this rowboat) was captured in one frame. This minimises the possibility of any stitching errors occurring on this object. Though the panohead has been aligned to the no-parallax-point, slight shifts due to uneven ground, movement of the tripod as it is rotated, etc., could introduce parallax errors especially with close-up objects. Centering such potential problem areas reduces the possibility of parallax errors happening.
Fourth Shot. We see a small amount of overexposured sky on the right. Hopefully this area will be covered by the extra shot that is exposed for the sky highlights. A belt-and-braces approach would be to take extra shots on either side of the brightest sky areas. This was done but I have omitted this from the example as it is not strictly necessary to illustrate the points.
Extra Shot. This shot was taken by pointing the camera directly at the brightest part of the sky and allowing the autoexposure to control the shutter speed and capture the highlights. Alternatively, the other shots could have been bracketed, e.g. +/-3EV and a conventional HDR+Tonemapping process applied. Here, we show that a much faster and simpler process can produce acceptable results without the extra shots and processing. The wide latitude of modern cameras reduces the need for bracketing and raw processors are very good at extracting highlight and shadow detail.
Zenith Shot. This is taken pointed straight up. In order to position it in the final panorama, I have included a few features in the corners than can be used to locate it via control points. As there are no important features in the sky, it is not important to precisely align it with the other images, hence it could be manually positioned in a pinch.
Nadir Shot. I have a Nadir Adapter on the Nodal Ninja 3 Mk III panohead that allows the taking of the straight down shot very easily. It also provides extra vertical rail height to allow the A7m3+12mm/2.8 combo to rotate to Zenith easily.
Masking Source Images. The tripod and corners are masked off first. The corners often suffer darkening due to vignetting, masking them off can improve photometric optimisation and matching. The overexposed sunset sky is also masked off and will be replaced by a separate shot that is exposed for the sky. This was taken by just pointing the camera straight at the brightest point in the scene and allowing the autoexposure to set the shutter speed to capture the highlights. The Zenith and Nadir images are also given a circular crop.
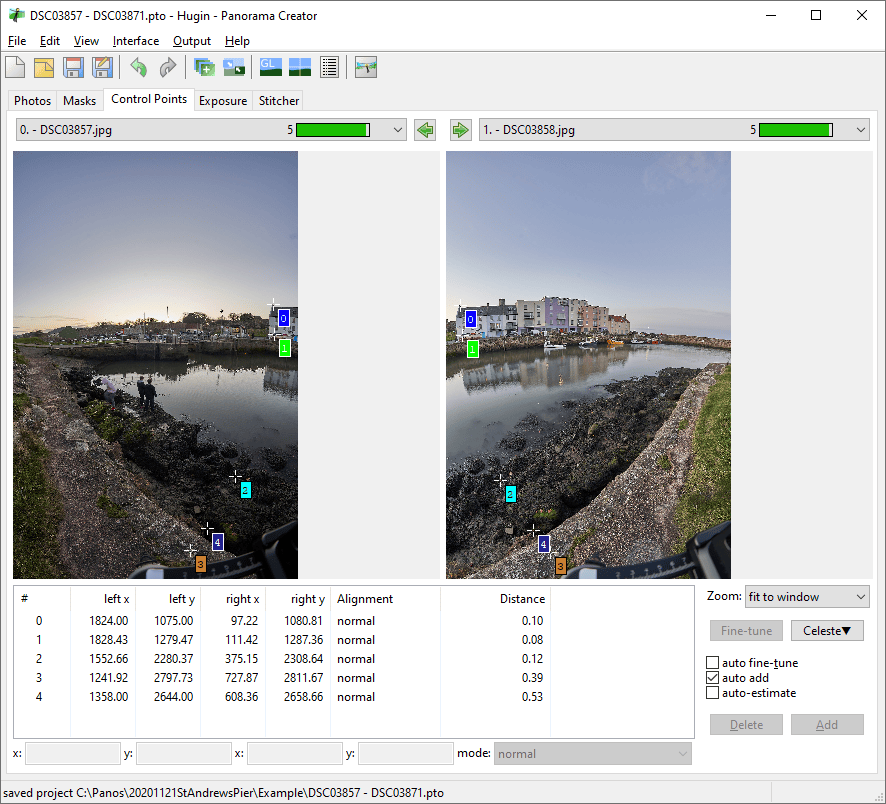
Adding Control Points. Only a few control points (CPs) are required to get a good stitch if the rotation axis is well aligned with the entrance pupil aka no-parallax-point (NPP). Some of the images pairs have 4 CPs, some only 2, and a few have more. It is only necessary to place the CPs long the likely seam lines of the final stitch. Placing CPs away from the seams means that alignment is compromised in the regions where alignment errors are actually visible. A few well chosen CPs will give better results than heaps of widely spread CPs that may have mismatched features. NB: The NPP is often erroneously called the “Nodal Point” but the entrance pupil does not in fact correspond to any of the (several) nodal points of a lens (look them up on Wikipedia). It’s like calling the steering wheel a “tyre”, they are both round and are parts of a car, but they are not the same thing.
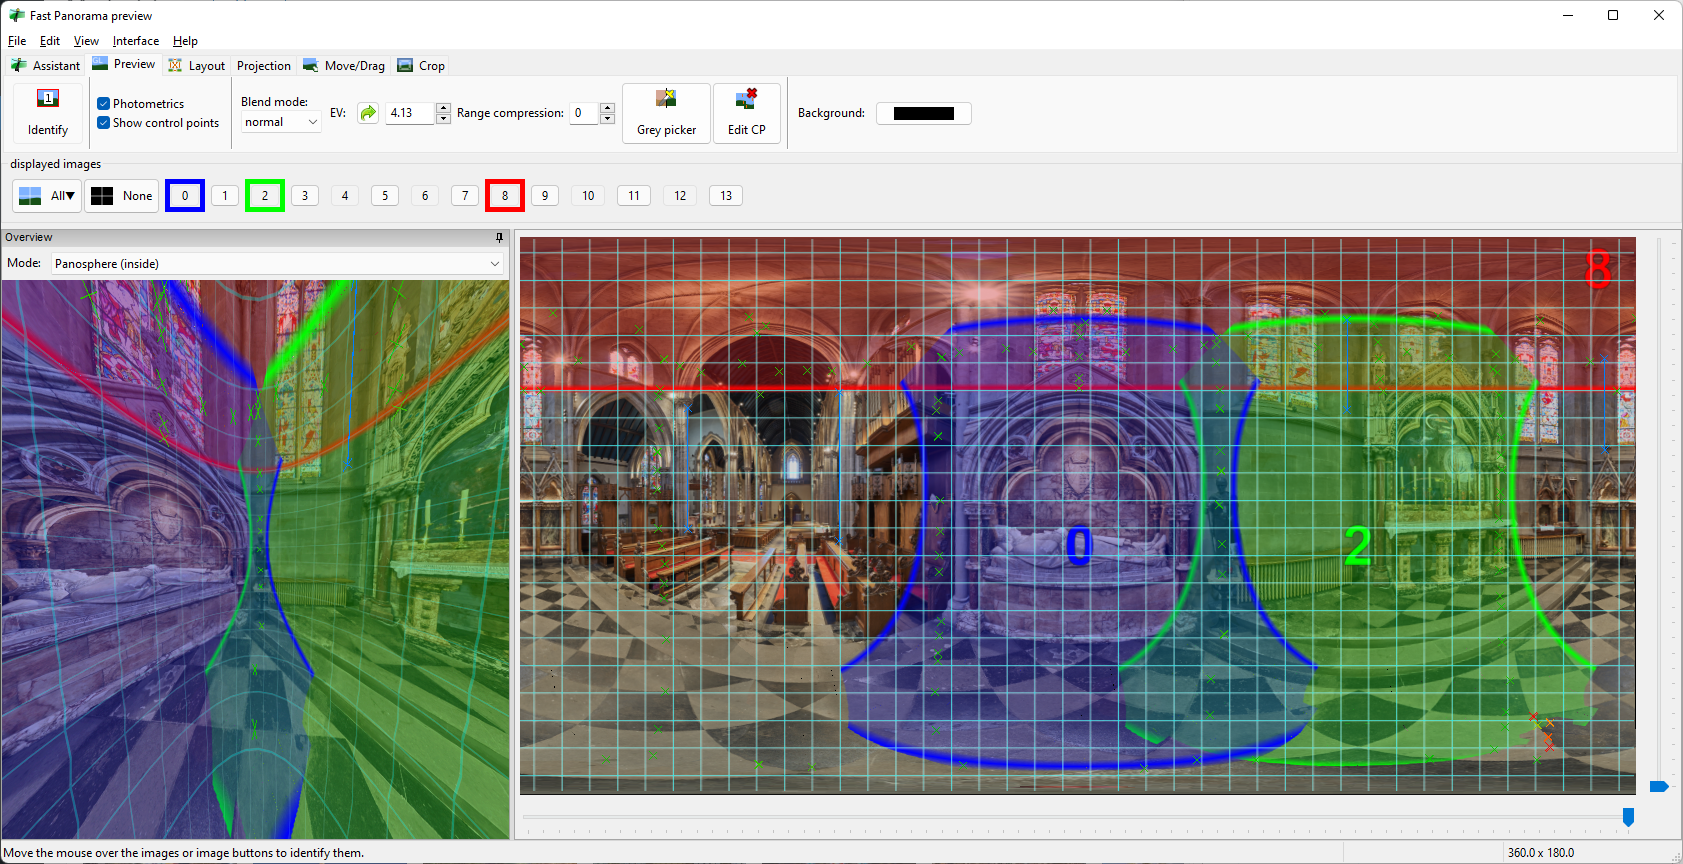
Preview Window. This is how the aligned images are placed, green crosses show the location of the control points. The small exposure differences will be eliminated during the stitching and blending process. The panorama is exported at a reduced exposure so that the highlights are not blown out. Exposure range compression can be used to bring back shadow detail. Curves adjustment in post-processing can then equalise the exposure to obtain a pleasing image.

Autoexposure Hugin Example Files

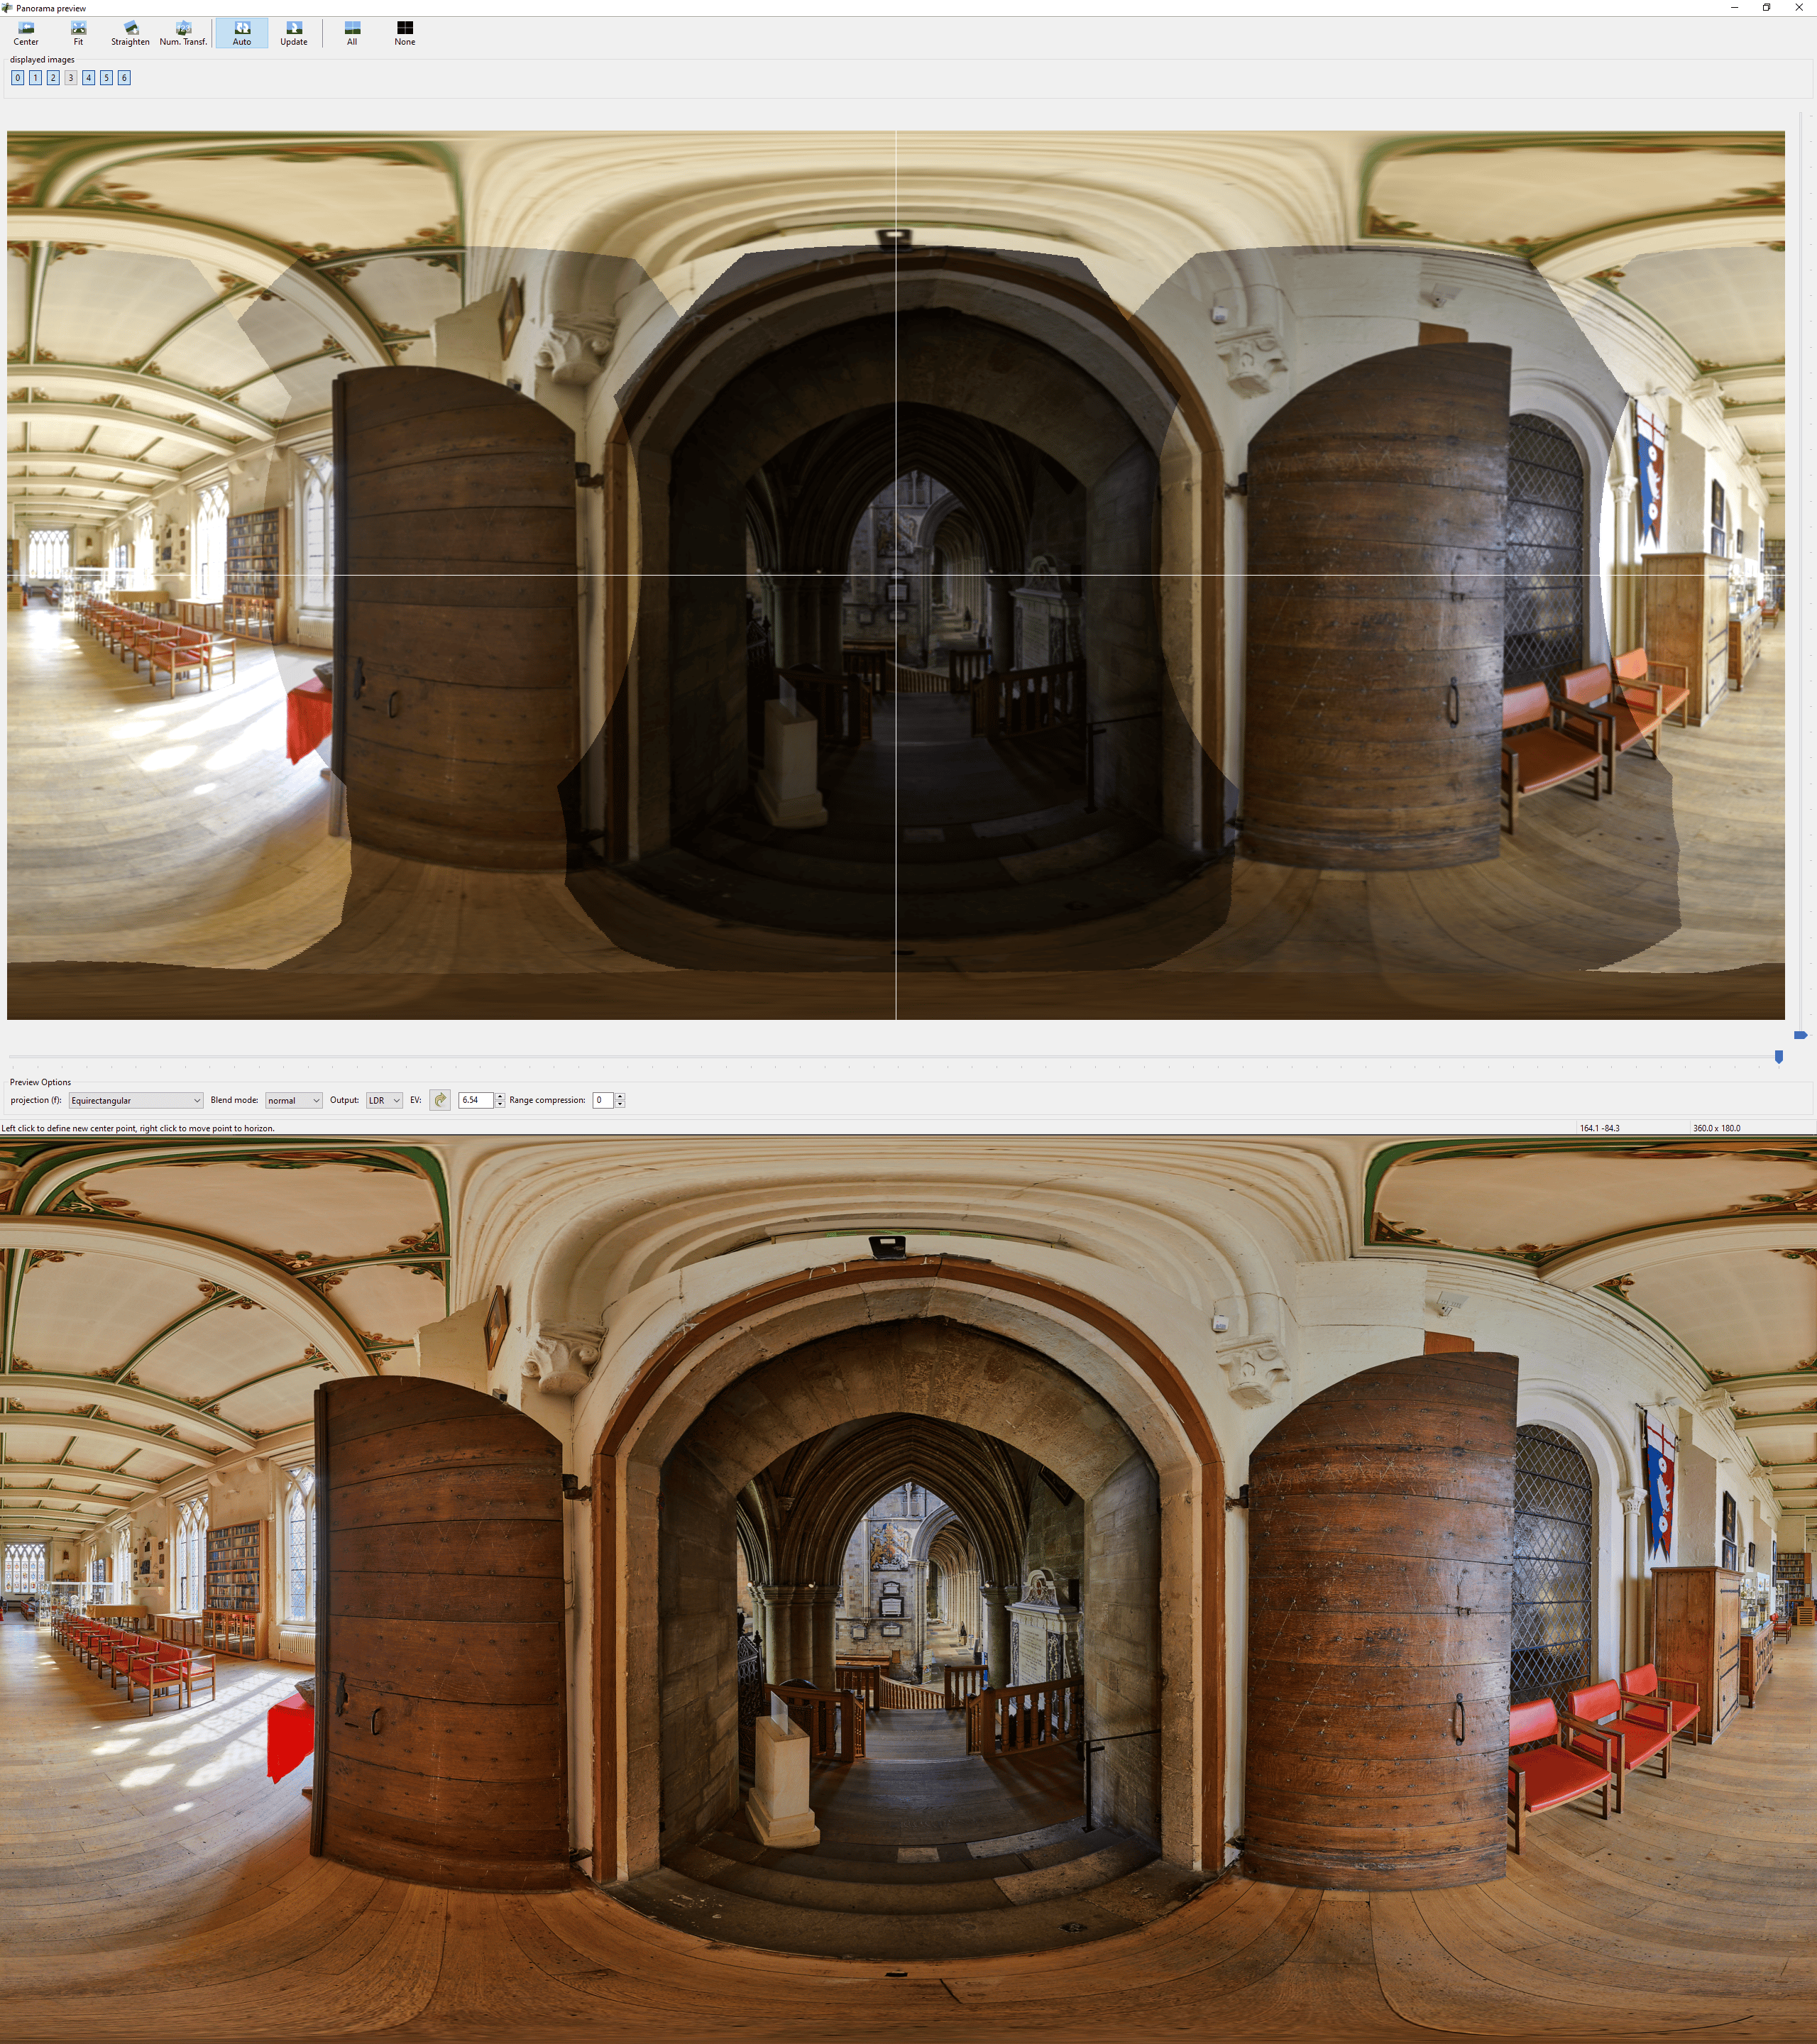
Ripon Cathedral Library. The contrast within the scene was quite large, varying from 0.63s exposure at ISO100 F8 looking down into the dark interior of the Cathedral, to 1/40th when pointed at the sunlit windows of the Library. But since these appeared on two different frames, I could simply expose separately. The traditional approach would have used a 1/5th base exposure together with a +/-3EV bracket to capture the darkest and brightest parts of the scene.

Traditionally, panoramas would be taken using a fixed manual exposure, bracketed if needed. But panoramic software has advanced to the point that they can handle the assembly and blending of source images taken with wildly different exposures. I am making available a set of files taken in Ripon Cathedral that shows the ease at which high contrast scenes can be tackled without having to take large amounts of bracketed photos.

Creative Commons Licence
This work is licensed under a Creative Commons Attribution-NonCommercial-ShareAlike 4.0 International License.

In this example, the base exposure throughout the scene varied by 6 stops (1/40th to 0.63s) hence there was a large amount of inter-frame contrast. But the contrast in any one frame (intra-frame) was just within the capabilities of my camera, hence I was able to take a 5+1+1 shooting pattern, without bracketing, and capture the scene without excessively blown highlights. This is variation of the usual 4+1+1 shooting pattern but with an extra shot that was taken aimed at the bright highlights of the sunlit windows.

Hugin Fast Preview Window. The position of the control points are marked by green crosses. The frames have been exposure matched and photometrically optimised for better blending. Normally, I use a 4 shots taken at -10 deg pitch and at 90 degree yaw intervals, together with zenith and nadir shots (4+1+1 shoot pattern). Here, there is an extra shot taken in between the 3rd and 4th shot at approximately 225 deg yaw that has captured the highlights of the sunlilt windows.

This extra shot was masked into the rest of the pano and invoked for an “underexposed” export of the stitch in addition to the normally exposed export. Hugin has no problems in handling the differently exposed frames and after photometric optimisation, the frames blend seamlessly. The normal and underexposed versions were combined using Enfuse and minor edits performed.

Top: Assembled panorama before photometric optimisation. Bottom: Optimised and exposure blended result (before final adjustments).

Hopefully this example demonstrates that panoramic software tools have come a long way since the traditional advice of locking off exposure was formulated. With some practice, the use of autoexposure when taking panoramas can be quite effective in speeding up workflow and creating a more efficient workflow. Of course, judgement is still required to use where necessary bracketing in order to tame intra-frame (as opposed to inter-frame) contrast.

Landscape and Panoramic Specialist in Glasgow